By now, we had a good play with Prisma and created an application that can load a person’s Spotify playlists. On click, the person can add this playlist to our Postgres database.
Today, we’ll look at creating static pages from this data for a blazing fast website.
For those willing to work alongside us. Take the following GitHub branch as your starting point.
Creating the list of playlists
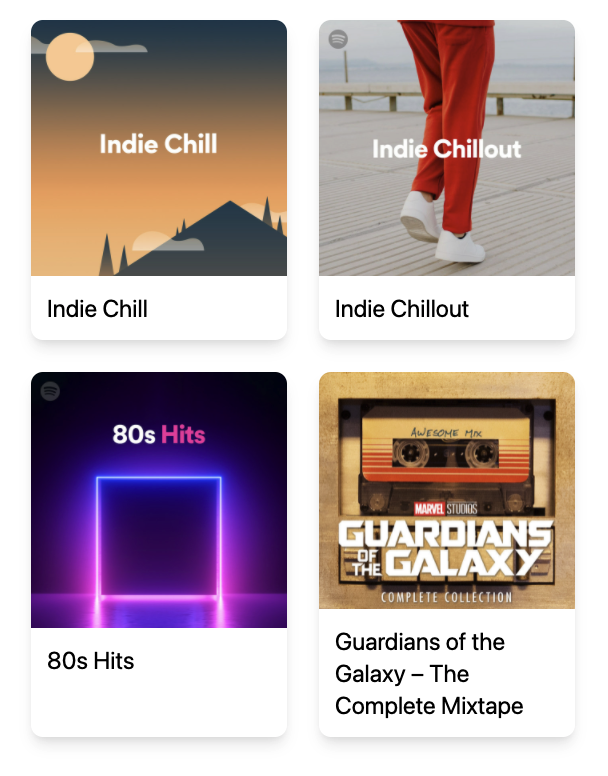
Once you have filled your database with some playlists, go ahead and open up the existing pages/index.js file and change it to show the database playlists.
To get started, I renamed the existing index.js file to new.js because we want to use this as a separate page.
Then create the new index.js page and follow the following boilerplate.
export async function getStaticProps() {

}

const Index = ({ playlists }) => (

);
export default Index;
The first thing we need to do is import the Next.js link and the Prisma client.
import Link from 'next/link';
import { PrismaClient } from '@prisma/client';
Then in our getStaticProps, we can leverage this Prisma client and retrieve all playlists.
export async function getStaticProps() {
  const prisma = new PrismaClient();
  const playlists = await prisma.playlist.findMany();
  return {
    props: {
      playlists,
    },
  };
}
This will query our database and return all the playlists as props to our page.
In the meantime, I’ve added Tailwind to this Next.js project to make it look a bit fancier.
We render a grid of playlists inside our template, each link to its page.
const Index = ({ playlists }) => (
  <ul className='grid grid-cols-2 max-w-xl'>
    {playlists.map((playlist) => (
      <li key={playlist.id} className='rounded-xl shadow-lg m-4'>
        <Link href={`/playlist/${playlist.id}`}>
          <a>
            <img
              src={playlist?.image}
              className='object-cover w-full rounded-t-xl'
            />
            <h3 className='text-2xl m-4'>{playlist.title}</h3>
          </a>
        </Link>
      </li>
    ))}
  </ul>
);

Creating the individual playlist pages
Once we have our index file setup, we can move to the individual pages.
We created links to these pages as playlist/[id], so that’s what we’ll have to make.
Create a new file pages/playlist/[id].js.
For this file, we will use the following boilerplate.
export async function getStaticProps({ params }) {

}

export async function getStaticPaths() {

}

const Playlist = ({ playlist }) => (

);
export default Playlist;
The main difference here is that we need both getStaticProps and getStaticPaths.
The getStaticPaths function will create single pages for a whole collection, where the getStaticProps will find the details for one of these items.
In this file, we also need our Prisma client.
import { PrismaClient } from '@prisma/client';
Then let’s first work on the getStaticPaths function to build all the individual pages.
export async function getStaticPaths() {
  const prisma = new PrismaClient();
  const playlists = await prisma.playlist.findMany();

  return {
    paths: playlists.map((playlist) => ({
      params: {
        id: playlist.id.toString(),
      },
    })),
    fallback: false,
  };
}
Here we use the same query to retrieve all our data and pass this on as unique paths based on the ID.
We can then use this ID in our getStaticProps function to get a single record.
export async function getStaticProps({ params }) {
  const prisma = new PrismaClient();
  const playlist = await prisma.playlist.findUnique({
    where: {
      id: Number(params.id),
    },
  });

  return {
    props: {
      playlist,
    },
  };
}
This will return a single playlist to the page. In which we will render a simple UI with a button to Spotify.
const Playlist = ({ playlist }) => (
  <div className='rounded-xl shadow-lg'>
    <img src={playlist?.image} className='object-cover w-full rounded-t-xl' />
    <div className='m-4'>
      <h1 className='text-4xl'>{playlist.title}</h1>
      <a className='underline mt-4 block' href={playlist.uri}>
        Open on Spotify
      </a>
    </div>
  </div>
);

And that’s it. We now have a static generated Next.js website based on data from our Postgres database.
You can find the complete code on GitHub.
Thank you for reading, and let’s connect!
Thank you for reading my blog. Feel free to subscribe to my email newsletter and connect on Facebook or Twitter

