We currently have a list of Spotify playlists for our application that we can add to our Postgres database through Prisma.
I’ll add an upvotes model to this mix in this article. This upvotes model should allow the user to add a vote for a playlist.
Since we don’t have a user table in our application, we’ll use their unique email to submit an upvote.
If you’d like to follow along, take the following GitHub branch s your starting point.
Creating the schema
Let’s start by adding the upvote schema in our Prisma file. To do this, open up the prisma/prisma.schema file and add the following model.
model Upvote {
  id            Int      @id @default(autoincrement())
  playlist      Playlist @relation(fields: [playlistId], references: [id])
  playlistId    Int
  votedBy       String
}
We also need to define the relationship on the playlist side, so add an upvotes array.
model Playlist {
  id           Int @default(autoincrement()) @id
  title        String
  image        String?
  uri          String @unique
  addedBy      String
  upvotes      Upvote[]
}
Now it’s time to up our new database structure:
npx prisma db push
And don’t forget after each database modification, we have to run the following command to keep our local client up to date:
npx prisma generate
Creating the upvote button
My idea is to only show the upvote button to people who are logged in. It’s ok for anonymous users to browse the playlists, but they should not cast an upvote.
So open up the pages/index.js file and add the session to the page.
const Index = ({ playlists }) => {
  const { data: session } = useSession();

  // Rest of page
};
Then where we first had our playlist title, we now expand and introduce a new button.
<div className='m-4'>
  <h3 className='text-2xl '>{playlist.title}</h3>
  {session && (
    <button
      className='block mt-4 underline'
      onClick={() => upvote(playlist.id)}
    >
      Upvote playlist)
    </button>
  )}
</div>
Note: I only made the image clickable in the new version.
This button will only show to people who have an active session.
It will call the upvote function and pass that playlist’s ID on click.
Let’s create this upvote function.
const upvote = async (playlistId) => {
  const res = await fetch('api/upvotes', {
    method: 'POST',
    body: JSON.stringify({ playlistId: playlistId }),
  });
  const data = await res.json();
};
As you can see, this calls a new API endpoint called upvotes. It will perform a post and pass the playlist ID as an object.
We are not using the return data, but we could use this, later on to add a vote in real-time.
Creating the API endpoint to post upvotes
Now, create a new file called upvotes.js in the pages/api folder.
The rough structure will look like so:
import { getSession } from 'next-auth/react';
import { PrismaClient } from '@prisma/client';
const prisma = new PrismaClient();

const handler = async (req, res) => {
  const {
    token: { email },
  } = await getSession({ req });
  if (req.method === 'POST') {
    // POST REQUEST
  }
  res.end();
};

export default handler;
Inside this POST capture is where we can do our magic and create a new upvote.
const { body } = req;
const upvote = { ...JSON.parse(body), votedBy: email };
const vote = await prisma.upvote.create({
  data: upvote,
});
return res.status(200).json(vote);
As you can see, we combine the playlistId (in the body) with a votedBy object representing the user. Then we call the create function on the upvotes model.
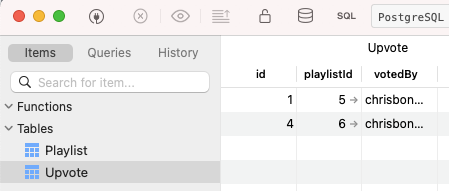
If we now run our code and click one of the buttons, we should see an upvote in the database.
With that, we reached an end for this article. We are now able to create a one-to-many relationship through our Prisma client.
You can find the complete code on GitHub.
Thank you for reading, and let’s connect!
Thank you for reading my blog. Feel free to subscribe to my email newsletter and connect on Facebook or Twitter