Now that we started our first Remix Project, let’s see how we can make it more interactive.
In this article, we’ll add loading data to our static Remix website so far.
With loading data, I’m referring to pages that get created on the fly and can eventually be powered by an external source.
Creating a post pages
We want to make a post overview with all posts we have for this article. While clicking on each item, we should be able to navigate to a single page.
Something similar to this:
- posts/
- posts/post-1
- posts/post-2
Let’s start by creating this dynamic post overview page.
Creating the overview page
Single, we will create multiple posts based pages. Let’s create a directory in our routes folder called posts.
Inside this folder, create the index.tsx file. This will act as our overview page.
We will leverage the useLoaderData hook to load our posts, which can be used to return JSON parsed data for route loaders.
First, we want to define our posts object and load all the needed imports.
import { json } from '@remix-run/node';
import { Link, useLoaderData } from '@remix-run/react';

export const loader = async () => {
  return json({
    posts: [
      {
        slug: 'post-1',
        title: 'My First Post',
      },
      {
        slug: 'post-2',
        title: 'The second post I ever made',
      },
    ],
  });
};
Then we can export our actual rendered element which would look like this:
export default function Posts() {
const { posts } = useLoaderData();
return (
<main>
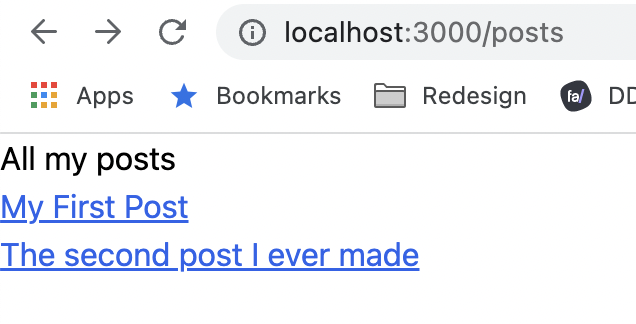
<h1>All my posts</h1>
<ul>
{posts.map((post) => (
<li key={post.slug}>
<Link to={post.slug} className='text-blue-600 underline'>
{post.title}
</Link>
</li>
))}
</ul>
</main>
);
}
If we now run our project with npm run dev, we can see all the posts and even click through them.
Nice!
But before we continue, let’s refactor this post array to be defined somewhere, as we want to re-use it for the single pages.
Remix recommends using a model in the models folder.
Let’s add a post.server.ts file in this folder.
type Post = {
  slug: string,
  title: string,
};

export async function getPosts(): Promise<Array<Post>> {
  return [
    {
      slug: 'post-1',
      title: 'My First Post',
    },
    {
      slug: 'post-2',
      title: 'The second post I ever made',
    },
  ];
}
We also upgraded to reflect the types for this post, as Remix loves TypeScript.
Then we can go back to our pages/posts/index.tsx and change the loader to look like this:
type LoaderData = {
  posts: Awaited<ReturnType<typeof getPosts>>,
};

export const loader = async () => {
  return (
    json <
    LoaderData >
    {
      posts: await getPosts(),
    }
  );
};
And by defining these types, we can also fix our render to reflect the typings.
export default function Posts() {
  const { posts } = useLoaderData() as LoaderData;
  ...
}
Perfect, Remix happy, and TypeScript satisfied.
You can find today’s completed code on GitHub
Thank you for reading, and let’s connect!
Thank you for reading my blog. Feel free to subscribe to my email newsletter and connect on Facebook or Twitter