Suppose you had a look at the 2021 stack overflow developer survey results.
In that case, you may see that PostgreSQL, or Postgres for short, is now the second most loved database.
I personally love Postgres as well. Hence, time to dedicate an article on how to set up PostgreSQL on a Mac.
In this tutorial you will learn to install Postgres on a Macintosh using Homebrew, plus we will explore the database a bit 👀.
If you haven’t used Homebrew before, check out my article on using Homebrew.
How to install Postgres with Homebrew
The first thing we want to do is to install Postgres DB.
Before running any install command in Homebrew, it’s good to ensure your installation is up to date.
brew update
Now is the time; to install PostgreSQL run this command:
brew install postgresql
Once the installation is finished, you should see this output line amongst some other information:
This formula has created a default database cluster with:
  initdb --locale=C -E UTF-8 /opt/homebrew/var/postgres
That means the Postgres DB is installed and you are set!
Start & Manage a Postgres database
To start the database, run the following command in the terminal:
brew services start postgresql
And to stop the Postgres database from running:
brew services stop postgresql
Once the DB is up and running, we want to create a root user to log in and interact with the database.
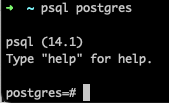
psql postgres
This will log you into the Postgres server.
From here, you can create a new user with a password.
CREATE ROLE chris WITH LOGIN PASSWORD 'password';
ALTER ROLE chris CREATEDB;
My user’s name is chris, and my password is super secure as: password.
Note: Use secure passwords, please. This is just a demo setup.
Connect to PostgreSQL DB
The easiest way to connect to Postgres is via the visual database connection tools.
If you are unsure what client to use: I’ve written down my top 5 SQL database clients.
We’ll use TablePlus to connect to our newly created PostgreSQL DB.
- Open the app, and create a “new connection”.
- For the type, you can choose “PostgreSQL”.
As for the connection details, you should use:
- User: The one you just created, in my case
chris. - Password: The password you set, in my case,
password. - Database: This will be
postgres.
The rest of the data should already be set up correctly.
You can test the connection by clicking the “Test” button at the bottom. It should turn everything green.
And that’s it. You are now connected to your Postgres database 🚀
Thank you for reading, and let’s connect!
Feel free to subscribe to my email newsletter and connect on Facebook or Twitter