This article will explore how to add a user service and log in to an Angular application.
We will have a login service, which will call an API (fake) and return a token.
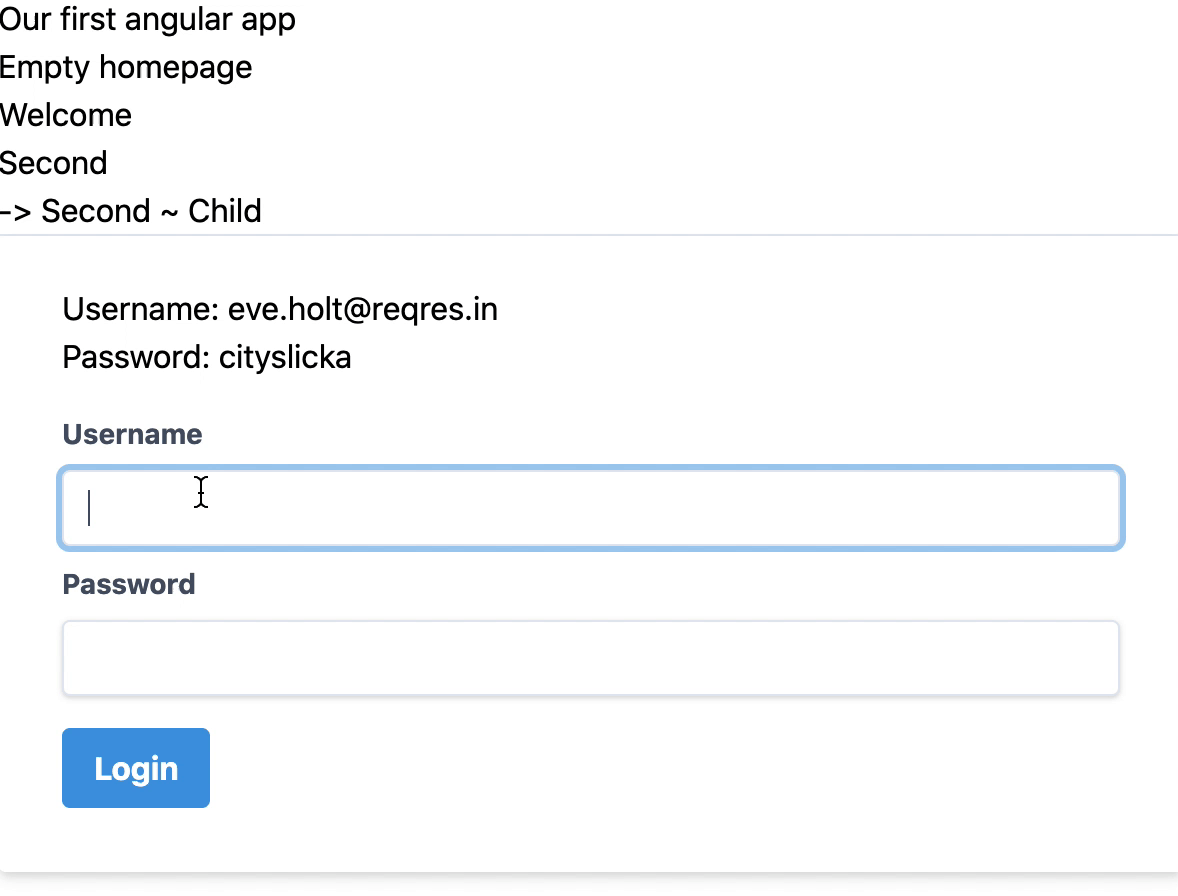
The result will look like this.
Creating a user model
Let’s start by defining a user model. In our case, we only store an email and a token.
Open your favorite terminal and run the following command.
ng generate class models/User --type=model
This will generate a user.model.ts file in the models’ folder.
Let’s change this file to reflect our model.
export class User {
    email: string;
    token?: string;
}
You can enhance this model to reflect an actual user. Since we are using a fake endpoint, we only get the email and token back.
Modifying our environment
One fantastic element of Angular is that it comes with environment files. We can keep track of environment-specific variables.
Our API endpoint is going to be one of those.
Our local, test, and production servers usually have different endpoints.
Open your environment/environment.ts file and make it look like this.
export const environment = {
  production: false,
  apiUrl: 'https://reqres.in/',
};
Creating the auth service
Ok, if we have our model, let’s go on to the service. The service will handle the login, user state, and logout functions.
First, we’ll generate this service in the terminal.
ng generate service services/Auth
This will create an auth.service.ts file in the services folder.
Let’s start by defining our variables.
private userSubject: BehaviorSubject<User>;
public user: Observable<User>;
We are using Subjects and observables to store our user object. This way, we can quickly notify other components of changes in this variable.
Next, we need to define our construct.
constructor(private http: HttpClient, private router: Router) {
  this.userSubject = new BehaviorSubject<User>(
    JSON.parse(localStorage.getItem('currentUser'))
  );
  this.user = this.userSubject.asObservable();
}
We are loading the Angular HttpClient and Router and subscribe to our userSubject to load whatever user object we have in our local storage.
Then we return the current user as an observable so it will be notified on every change.
Next, we’ll introduce a custom getter that will make it easy for other components to quickly get the value of the currently logged-in user without subscribing to our observable.
public get userValue(): User {
  return this.userSubject.value;
}
Note: You can see this as a once of data return.
Now let’s make our login function.
login(username: string, password: string) {
return this.http
  .post<any>(`${environment.apiUrl}/api/login`, { username, password })
  .pipe(
    map(({token}) => {
      let user: User = {
        email: username,
        token: token,
      };
      localStorage.setItem('currentUser', JSON.stringify(user));
      this.userSubject.next(user);
      return user;
    })
  );
}
We pass the username and password to this function as strings, then make a POST call to our defined apiUrl and call the api/login endpoint.
Here we pass the username and password variables.
Next, we use the pipe and map methods to return the data.
The API returns only a token, so let’s create a new user object with the username and token.
We then set the local storage to contain this token.
Next, we tell the userSubject we received a new value for the user observable.
And return the user object in this function.
Now onto our logout function
logout() {
  localStorage.removeItem('currentUser');
  this.userSubject.next(null);
}
The logout is as simple as removing the currentUser local storage object and sending a null object to our userSubject subject.
The entire file will look like this:
import { Injectable } from '@angular/core';
import { HttpClient } from '@angular/common/http';
import { map } from 'rxjs/operators';
import { BehaviorSubject, Observable } from 'rxjs';
import { Router } from '@angular/router';
import { User } from '../models/user.model';
import { environment } from '../../environments/environment';

@Injectable({
  providedIn: 'root',
})
export class AuthService {
  private userSubject: BehaviorSubject<User>;
  public user: Observable<User>;

  constructor(private http: HttpClient, private router: Router) {
    this.userSubject = new BehaviorSubject<User>(
      JSON.parse(localStorage.getItem('currentUser'))
    );
    this.user = this.userSubject.asObservable();
  }

  public get userValue(): User {
    return this.userSubject.value;
  }

  login(username: string, password: string) {
    return this.http
      .post<any>(`${environment.apiUrl}/api/login`, { username, password })
      .pipe(
        map(({token}) => {
          let user: User = {
            email: username,
            token: token,
          };
          localStorage.setItem('currentUser', JSON.stringify(user));
          this.userSubject.next(user);
          return user;
        })
      );
  }

  logout() {
    localStorage.removeItem('currentUser');
    this.userSubject.next(null);
  }
}
So, technically, we can log in users and store the user object in local storage, but we have no way to call this function?
Let’s also add the HttpModule to our app.module.ts.
@NgModule({
  declarations: [
    // All declarations
  ],
  imports: [
    // Other imports
    HttpClientModule
  ],
  providers: [],
  bootstrap: [AppComponent]
})
Adding a login page
Let’s add a login page, redirecting us to another page where we can see our user object.
Start by generating the login page.
ng generate component Login
The content will look like this.
import { Component, OnInit } from '@angular/core';
import { Router, ActivatedRoute } from '@angular/router';
import { FormBuilder, FormGroup, Validators } from '@angular/forms';
import { first } from 'rxjs/operators';
import { AuthService } from '../services/auth.service';

@Component({
  selector: 'app-login',
  templateUrl: './login.component.html',
  styleUrls: ['./login.component.scss'],
})
export class LoginComponent implements OnInit {
  loginForm: FormGroup;
  error = '';

  constructor(
    private formBuilder: FormBuilder,
    private router: Router,
    private authenticationService: AuthService
  ) {}

  ngOnInit() {
    this.loginForm = this.formBuilder.group({
      username: ['', Validators.required],
      password: ['', Validators.required],
    });
  }

  get f() {
    return this.loginForm.controls;
  }

  onSubmit() {
    if (this.loginForm.invalid) {
      return;
    }

    this.authenticationService
      .login(this.f.username.value, this.f.password.value)
      .pipe(first())
      .subscribe({
        next: () => {
          this.router.navigate(['/home']);
        },
        error: (error) => {
          this.error = error;
        },
      });
  }
}
We are using the form we learned in the article about Angular Reactive forms.
Then we call our authenticationService once we call the onSubmit function.
This will send the form’s username and password.
If we then get something back, we navigate to the home URL. If not, we will display whatever the error was.
The HTML for this, based on Tailwind CSS.
<form
  [formGroup]="loginForm"
  (ngSubmit)="onSubmit()"
  class="px-8 pt-6 pb-8 mb-4 bg-white rounded shadow-md"
>
  <div class="mb-4">
    Username: [email protected]<br />
    Password: cityslicka
  </div>
  <div class="form-group">
    <label class="block mb-2 text-sm font-bold text-gray-700" for="username"
      >Username</label
    >
    <input
      type="text"
      formControlName="username"
      class="w-full px-3 py-2 leading-tight text-gray-700 border rounded shadow appearance-none focus:outline-none focus:shadow-outline"
    />
  </div>
  <div class="form-group">
    <label
      class="block mt-2 mb-2 text-sm font-bold text-gray-700"
      for="password"
      >Password</label
    >
    <input
      type="password"
      formControlName="password"
      class="w-full px-3 py-2 leading-tight text-gray-700 border rounded shadow appearance-none focus:outline-none focus:shadow-outline"
    />
  </div>
  <button
    [disabled]="!loginForm.valid"
    class="px-4 py-2 mt-4 font-bold text-white bg-blue-500 rounded hover:bg-blue-700 focus:outline-none focus:shadow-outline"
  >
    Login
  </button>
  <div class="mt-2" *ngIf="error">* Error: {{ error.message }}</div>
</form>
Let’s add this route to our app-routing.module.ts file.
const routes: Routes = [
  {
    path: 'welcome',
    component: WelcomeComponent,
    children: [{ path: 'about', component: AboutComponent }],
  },
  {
    path: 'second',
    children: [
      { path: '', component: SecondComponent },
      { path: 'child', component: ChildComponent },
    ],
  },
  { path: 'login', component: LoginComponent },
  { path: '', redirectTo: '/welcome', pathMatch: 'full' },
  { path: '**', component: NotFoundComponent },
];
Creating the home route
We now want to redirect people to our home route and show our logged-in user details.
Let’s generate the home component.
ng generate component Home
The file will look like this.
import { Component } from '@angular/core';
import { User } from '../models/user.model';
import { AuthService } from '../services/auth.service';

@Component({
  selector: 'app-home',
  templateUrl: './home.component.html',
  styleUrls: ['./home.component.scss']
})
export class HomeComponent {
  currentUser: User;

  constructor(private authenticationService: AuthService
) {
  this.authenticationService.user.subscribe(user => this.currentUser = user);
 }

}
As you can see, we are loading our authService and subscribing to the user object.
So once the user object changes, this function will update the currentUser object in this component.
Then in our HTML, we return the user object.
<p>home works!</p>
<hr />
{{ currentUser | json }}
Now let’s also add this route to the routing file.
const routes: Routes = [
  {
    path: 'welcome',
    component: WelcomeComponent,
    children: [{ path: 'about', component: AboutComponent }],
  },
  {
    path: 'second',
    children: [
      { path: '', component: SecondComponent },
      { path: 'child', component: ChildComponent },
    ],
  },
  { path: 'login', component: LoginComponent },
  { path: 'home', component: HomeComponent },
  { path: '', redirectTo: '/welcome', pathMatch: 'full' },
  { path: '**', component: NotFoundComponent },
];
Excellent, we can now login as a user, store it in local storage, and see who is logged in on our homepage!
You can find the complete project code on GitHub.
Thank you for reading, and let’s connect!
Thank you for reading my blog. Feel free to subscribe to my email newsletter and connect on Facebook or Twitter