A while ago, I wrote an article on setting up a Laravel project but never got on to writing more Laravel stuff.
Today I’ll be going through some critical things, Databases! Laravel has a very excellent way of creating/maintaining databases in the form of migrations.
It means every time you need to make a change to a database. You’ll need to write a new migration. Yes, even if you want to change something on an old table.
And that has many benefits. It tells laravel what the old field was. You can auto-set new values and much more.
Another great thing about migration is the option to roll back a migration. Using the rollback will revert the migration as described in the migration file.
Setting the environment file
Before working with the database, we have to create a connection first.
These connections are maintained and defined in a so-called .env file.
Each Laravel project will come with the .env.example.
Copy the example to your version and change the variables to be correct.
For today we are just looking at the database section.
DB_CONNECTION=mysql
DB_HOST=mysql
DB_PORT=3306
DB_DATABASE=laravel_app
DB_USERNAME=root
DB_PASSWORD=
FORWARD_DB_PORT=3356
Creating our first Laravel migration
Enough talk. Let’s see how this works. Open your favorite terminal and navigate to your project root folder.
php artisan make:migration create_books_table
Running this command will create a new migrations file, which you can find under database/migrations/{time}_create_books_table.php.
You might see there are already the default migration files from Laravel in this folder.
Open up the newly created file.
There are two sections here, an up and a down. As mentioned above, the up will be used to create or alter tables. The down will be used when the rollback is called and generally should revert what happened in the up.
Let’s add some fields to our table.
Schema::create('books', function (Blueprint $table) {
    $table->id();
    $table->string('title');
    $table->number('year');
    $table->timestamps();
});
This will create a table called books with the following fields.
- id: auto-increment field
- title: string
- year: number
- created_at: datetime
- updated_at: datetime
The id and timestamps are, by default, added by Laravel.
Now, we can run the following command to run our new migration:
./vendor/bin/sail artisan migrate
If you haven’t used the new start, you can run:
php artisan migrate
This will create the table for us, and it should look something like this:
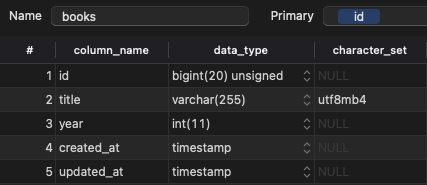
And there you go, our first database table in Laravel.
Thank you for reading, and let’s connect!
Thank you for reading my blog. Feel free to subscribe to my email newsletter and connect on Facebook or Twitter