I saw the concept of having a dynamic header a while ago, and ever since wanted to try this out myself!
The concept is not new as some people did this before me like:
I first thought of building this in PHP and using the ImageMagick library. However, I felt a node script might be more fun to play with.
You can see the result on my own Twitter page: @DailyDevTips1

Planning a dynamic Twitter header
But what exactly should happen? Let’s write down some steps.
- script runs
- get the latest 3 Twitter followers
- download profile pictures for these three people
- get the latest blog article title
- place profile pictures and title on a placeholder image
- upload placeholder image to Twitter
- 🔁 run every 60 seconds
With this plan in place, we can act on each step.
Let’s dive straight into it.
Creating our Twitter dynamic header project
As mentioned, we’ll build the tool in node, so let’s start creating a new application.
If you are looking to get started, check out this basic node express tutorial.
For now, let’s create a folder for our project and navigate to it. (Run this in your terminal)
mkdir twitter_header
cd twitter_header
Now it’s time to convert this into a node project. I’ve added the -y so it won’t ask all the basic setup questions.
npm init -y
The next part will be to install the packages we’ll be using.
npm install axios dotenv fs jimp sharp twitter-api-client
Running this command will download all the packages we need. Here is a list of what we’ll be using them for:
axios: To make our request and download the imagesdotenv: For using.envfiles, so our API credentials are safefs: The node filesystem package, we need this to write our downloaded images to the folderjimp: A super cool package to do image manipulationstwitter-api-client: Simon’s wrapper for the Twitter API in Node.js
Firstly open up your package.json file and change the script to look like this:
"scripts": {
  "start": "node index.js"
}
We’ll also convert this to a module to use imports.
"type": "module"
Since we included dotenv, we should go ahead and make an actual .env file and place our secrets in it.
API_KEY={TWITTER_API_KEY}
API_SECRET={TWITTER_API_SECRET}
CONSUMER_KEY={TWITTER_CONSUMER_KEY}
CONSUMER_SECRET={TWITTER_CONSUMER_SECRET}
TWITTER_HANDLE={TWITTER_HANDLE}
SITEMAP={SITEMAP}
You need to replace the {STRING} with your actual strings. I’ll show you where you can find them in the next section.
Making our Twitter App
Let’s head to the Twitter Developer portal to create a new app and get our API keys.
Sign up for an account if you haven’t done this yet. It might take some time to get accepted as a developer.
Once you are verified, let’s create our first app.
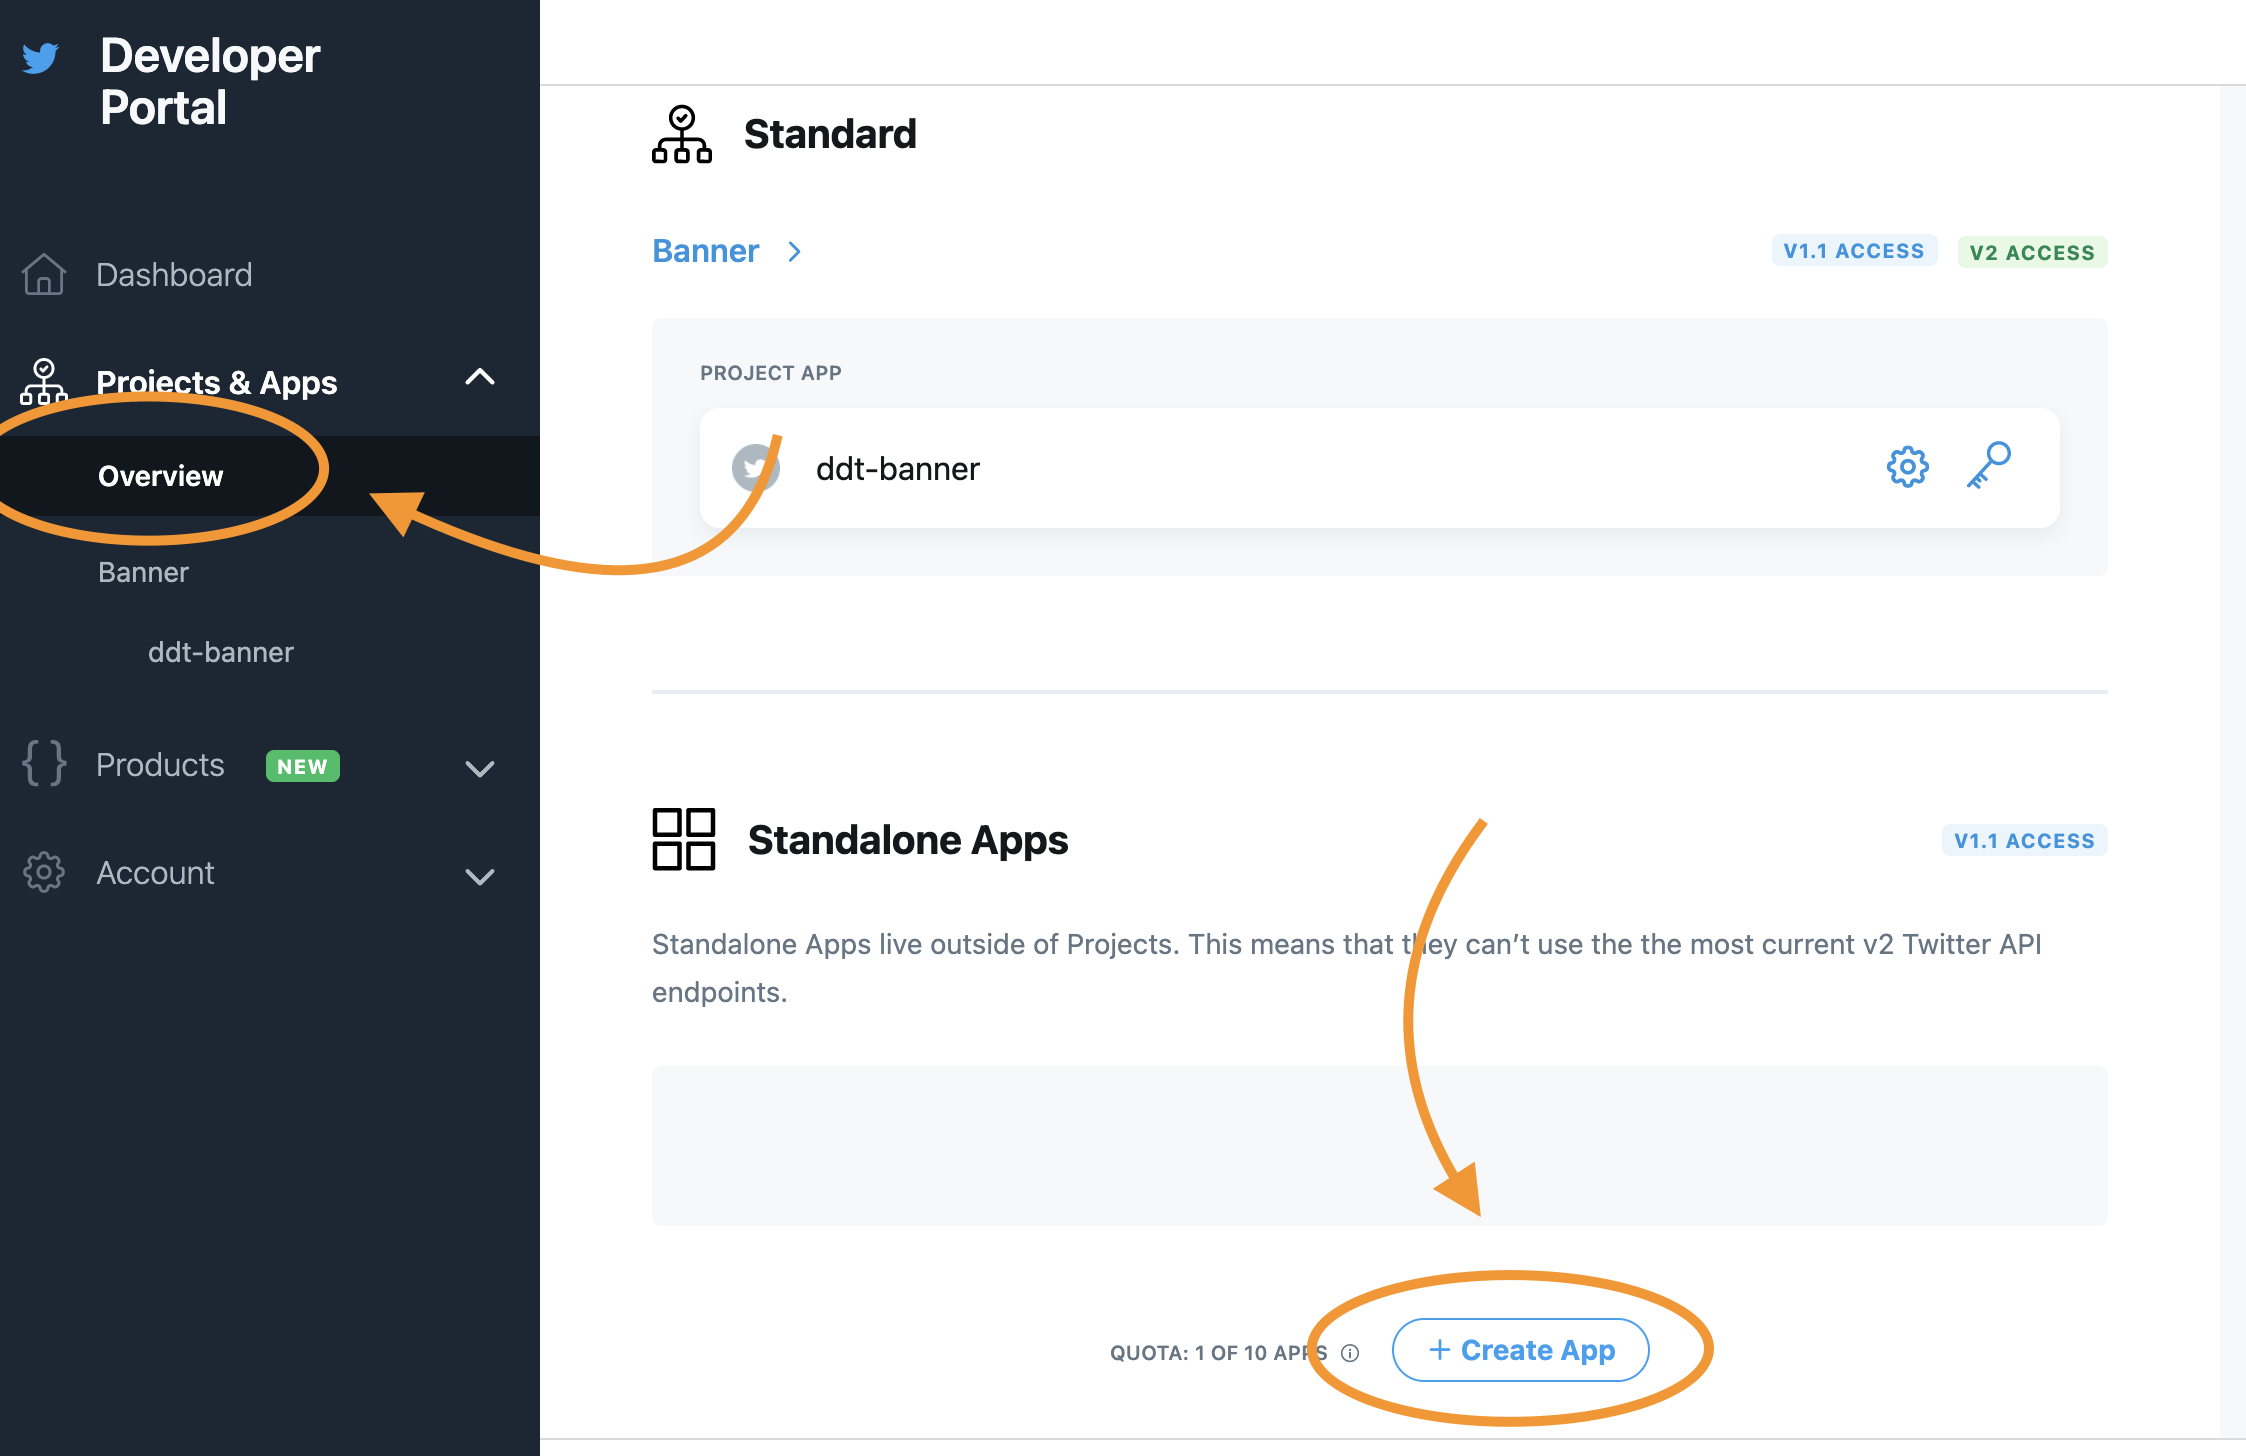
Give your app a cool name. Mine will be twitter_header.
You’ll get two API keys you’ll need on the next screen. Note these down in your .env file.
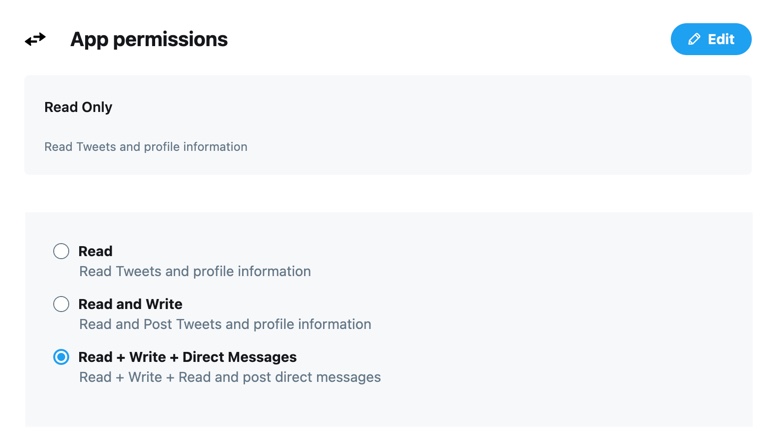
Once you’ve done that, you’ll get to a detailed screen. It’s essential to set the App Permissions to full access.
Once you have done the permissions, head to the “Keys and tokens” section and create a new Access Token.
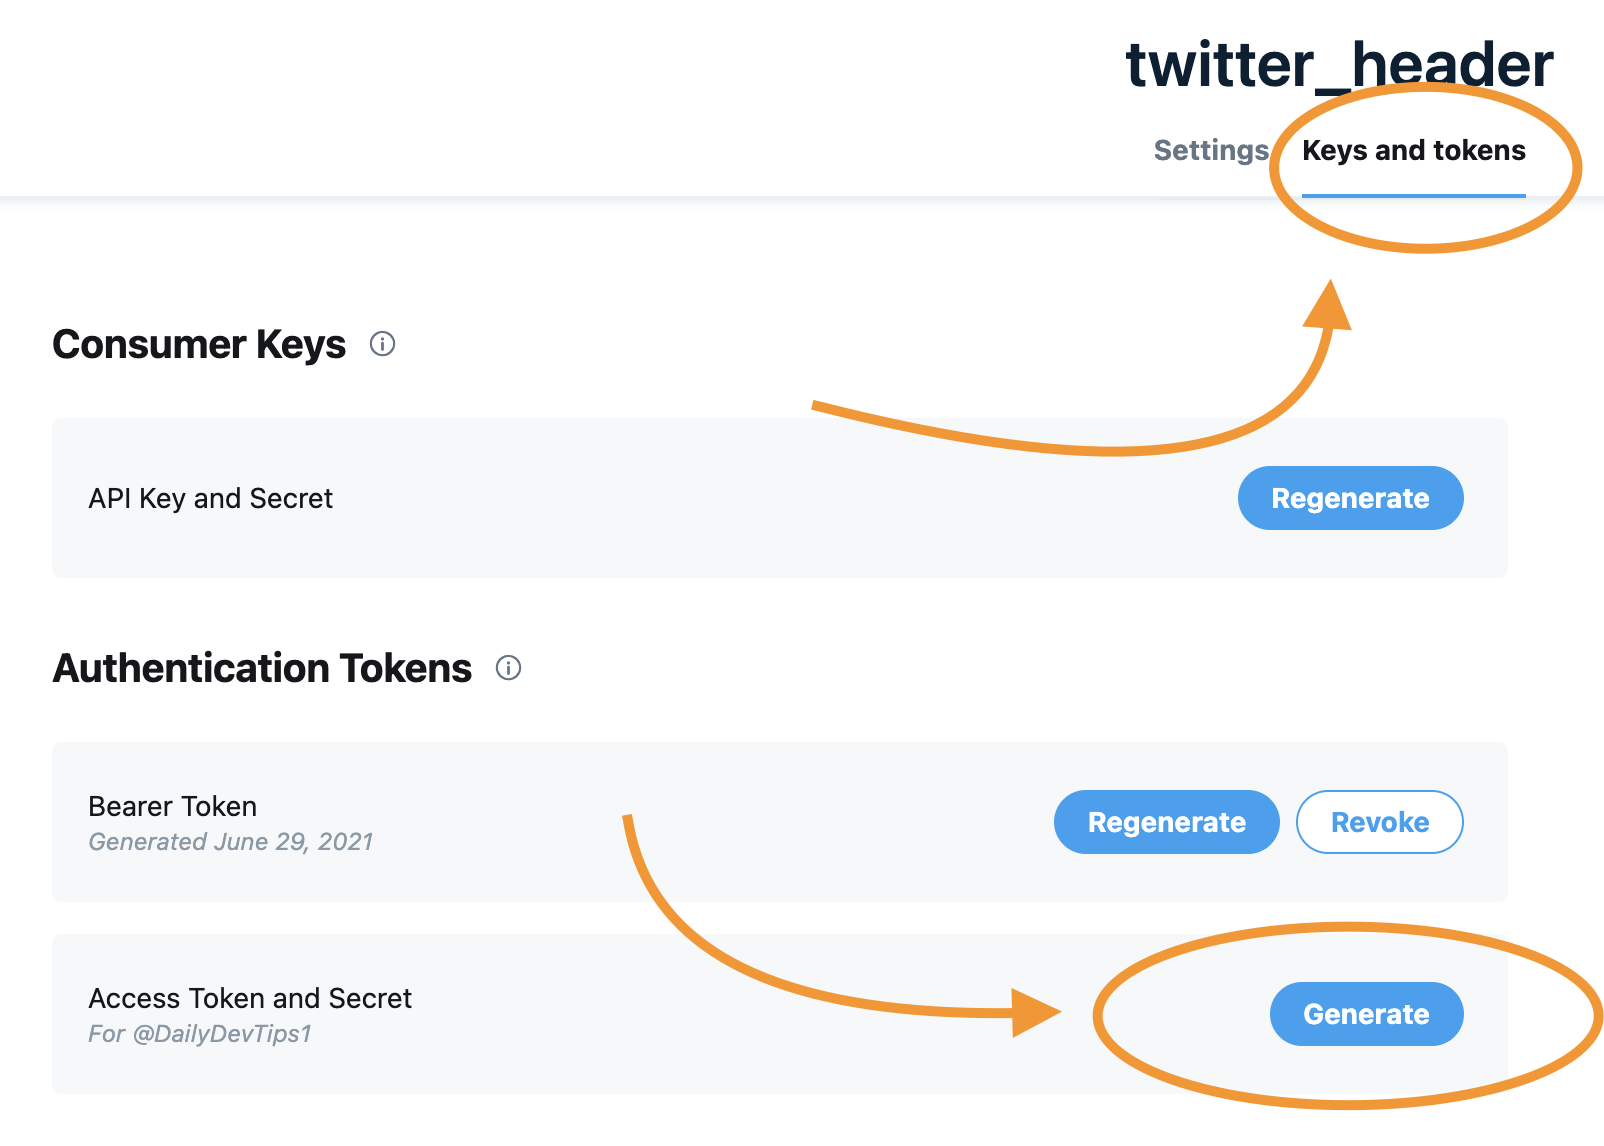
Place this access token and secret in your .env file!
They will allow us to upload the new image for your handle.
Programming the Node dynamic Twitter header script
Now that we have all these side admin things settled let’s go ahead and create our actual script.
Make a new file called index.js.
We’ll start by importing all the packages we need.
import dotenv from 'dotenv';
dotenv.config();
import { TwitterClient } from 'twitter-api-client';
import axios from 'axios';
import fs from 'fs';
import Jimp from 'jimp';
import { parseString } from 'xml2js';
import sharp from 'sharp';
The next step is to authenticate the TwitterClient.
const twitterClient = new TwitterClient({
  apiKey: process.env.API_KEY,
  apiSecret: process.env.API_SECRET,
  accessToken: process.env.CONSUMER_KEY,
  accessTokenSecret: process.env.CONSUMER_SECRET,
});
The next step is creating a function to retrieve the latest three followers for the Twitter handle.
async function getLatestFollowers() {
  const data = await twitterClient.accountsAndUsers.followersList({
    screen_name: process.env.TWITTER_HANDLE,
    count: 3,
  });

  let count = 0;
  const downloads = new Promise((resolve, reject) => {
    data.users.forEach((user, index, arr) => {
      downloadImage(user.profile_image_url_https, `${index}.png`).then(() => {
        count++;
        if (count === arr.length) resolve();
      });
    });
  });

  downloads.then(() => {
    drawBanner();
  });
}
As you can see, we are querying the Twitter API for the follower list for a specific handle. Then we create a new promise since we only want to continue the script once all three images are downloaded.
For each follower we download their profile_image_url_https.
And once these downloads are done, we resolve the promise and invoke a function called drawBanner.
Download the follower’s profile pictures
Before we look into that, let’s see what the downloadImage function does.
As you can see, it accepts the URL and a ${index}.png as parameters.
async function downloadImage(url, image_path) {
  await axios({
    url,
    responseType: 'arraybuffer',
  }).then(
    (response) =>
      new Promise((resolve, reject) => {
        resolve(sharp(response.data).resize(96, 96).toFile(image_path));
      })
  );
}
Here we use Axios to download the image as an array buffer. We then resolve by sharp saving the image double the size we receive.
I wanted to showcase the images a bit bigger, so that’s why I’m doing the 2x conversion.
Drawing the new Twitter header
The next function we invoked is the drawBanner function. The name states it already; it will draw our banner!
You will see below that it accepts the three profile pictures we just downloaded: ’ 0.png, 1.png, and 2.png`.
However, it also uses an image called 1500x500.jpg.
This image is the placeholder. You can create something in Photoshop, Sketch, or Canva.
async function drawBanner() {
  const images = ['1500x500.jpg', '0.png', '1.png', '2.png'];
  const promiseArray = [];
  images.forEach((image) => promiseArray.push(Jimp.read(image)));
  promiseArray.push(getLatestArticleHeadline());
  promiseArray.push(Jimp.loadFont(Jimp.FONT_SANS_32_BLACK));

  Promise.all(promiseArray).then(
    ([banner, imageOne, imageTwo, imageThree, headline, font]) => {
      console.log(`Current headline: ${headline}`);
      banner.composite(imageOne, 1050, 80);
      banner.composite(imageTwo, 1158, 80);
      banner.composite(imageThree, 1264, 80);
      banner.print(font, 410, 410, headline);
      banner.write('1500x500.png', function () {
        uploadBanner();
      });
    }
  );
}
This function takes an array for the four images we want to merge and create an empty promise array.
We push each image as a Jimp.read. This is needed because Jimp needs to load all the photos before using them.
We then also push a promise that’s called getLatestArticleHeaderline. This function will retrieve the latest article based on our sitemap.xml file.
Then we also load a font as a promise so we can use that to write this headline on our banner.
Then, once all promises are made (so all loaded), we return them as a named array. I find this easier to see which variable cohorts with which promise.
We then use the Jimp composite and print function to place our thumbnails and article headline on our root image.
The last step is to write it to a file called 1500x500.png and invoke the uploadBanner function.
Retrieving the latest article headline
Let’s take a quick look at how we retrieved the last article headline.
As you can see in our .env file, we state where our sitemap.xml file could be found.
async function getLatestArticleHeadline() {
  let title = '';
  await axios.get(process.env.SITEMAP).then((data) => {
    parseString(data.data, function (err, data) {
      title = data.feed.entry[0].title[0];
    });
  });
  return title;
}
We then use Axios to get this sitemap and the parseString function to convert it to a readable object.
From this object, I return the title of the first item as a string.
Uploading the new banner to Twitter
The last function we need is the uploadBanner function.
This should take our new banner and upload it back to Twitter.
async function uploadBanner() {
  const base64 = await fs.readFileSync('1500x500.png', { encoding: 'base64' });
  await twitterClient.accountsAndUsers
    .accountUpdateProfileBanner({
      banner: base64,
    })
    .then((d) => {
      console.log('Upload to Twitter done');
    });
}
As you can see, we need to upload our image as a base64 string.
We use the node filesystem to do that.
Then we call the Twitter API again and pass the base64 string to the accountUpdateProfileBanner function.
Once it’s done for my script, I added a log, but you don’t need that part.
And with that, we have the full flow done. We need to make sure the script refreshes every 60 seconds.
getLatestFollowers();
setInterval(() => {
  getLatestFollowers();
}, 60000);
If you want to see or use the project, please check out my Twitter dynamic header on GitHub.
Thank you for reading, and let’s connect!
Thank you for reading my blog. Feel free to subscribe to my email newsletter and connect on Facebook or Twitter